In this article I present an overall and introductory view of the GIT versioning system software, to help you start the source code version management with it.
Git is the primary system for source code and software project management as a service (source code repositories) such as Github, Gitlab and Bitbucket.
Before we start, first of all, can you answer the following question: What is “Versioning Control”, or what is “Software Versioning”?
Software Versioning Concept
GIT is today the version control system in fact of the software development market.
What is Version Control System
A version control system records changes in a file or file set over time so that specific versions can be recovered and managed. This is a very brief definition of software version and you should read more in the article on “Software Configuration Management”
Also read What is Version Control? for a broader understanding of software versioning.
Basic Git - Introduction
Above all, it is necessary to understand how GIT works, so as not to become just a commander as if followed a step-by-step recipe without the real understanding of the management behind the process.
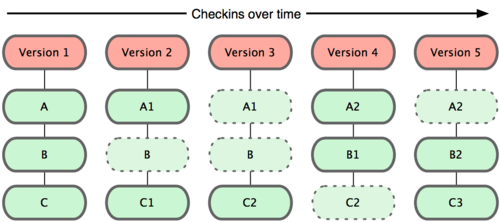
Git considers that data are like a set of snapshots - capturing something at a given time, as in a photo). Therefore, each time you save or consolidate - that is, performs a commit, the state of your project in GIT, in short, is as if it took a picture of all his files at that time and stored a Reference for this capture.
In order to be efficient, if no change has been made in a particular file, at a time of version, the information of this file is not stored again. In other words, just a link to the previous identical file that has already been stored. Thus the system ensures efficient space economy, as well as performance.
Features
At first, the main git characteristics are:
- Almost all operations are local
- Git has integrity checksum
- Git usually only adds data
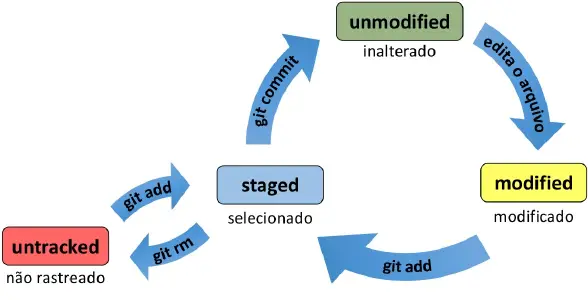
File States
- commited: when they are surely stored in their local database
- modified: When there was a change that is not yet consolidated (commited)
- staged: when a modified file is marked to be part of a
commit
Workflow
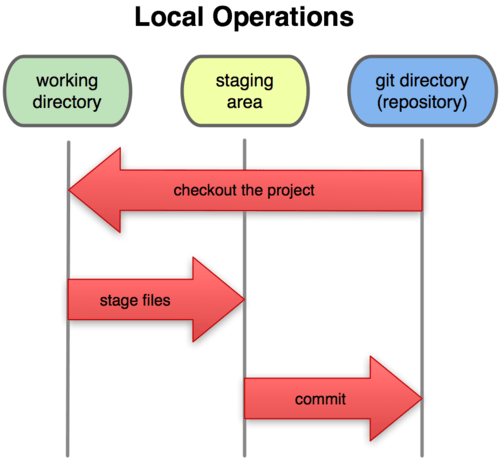
Basic and working diary flow can be described with the following steps:
- You modify files in your work directory.
- You select the files by adding snapshots to your staged area.
- You run a
commit(which is a GIT command), which takes files as they are in your area preparation and stores them permanently in your GIT directory.
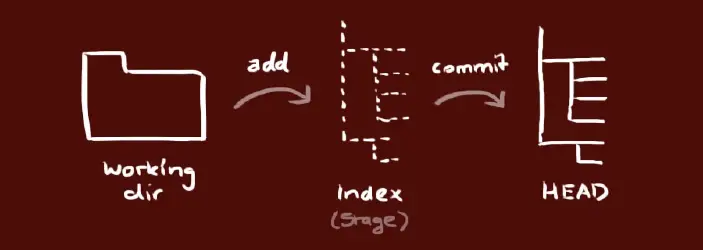
Your local repositories consist of three “trees” maintained by GIT.
- Working Directory containing the current files.
- Index that acts as a temporary area (stage)
- HEAD which points to the last commit (confirmation) you made.
From an “unmanaged” state, the files enter a cycle of state changes to each modification and subsequent consolidation.
Installing Git - Linux and Windows
In Debian based Linux operating systems, ie Ubuntu, Linux Mint, Git is available in the standard repositories, just run the following command on the console:
sudo apt-get install git
For Windows you need to download an installer, which when running besides making available GIT, also offers a console compatible with Bash Shell of the Linux terminals.
First download the file from the Git for windows .
Find the downloaded file and run the installer, from this point only follow the installation steps.
For more detailed information about the installation of GIT, Read the article.
GIT basic configuration
To use GIT in your machine, first you need to configure with your author data. Since all commits must be identified.
The /etc/gitconfig file contains configuration values for all system users and all their repositories. If you pass the --system option to git config, it will read and write from this file specifically.
The ~/.gitconfig file is specific to your user. You can make Git read and write from this file by passing the option --global.
The configuration file in the GIT directory (ie in the local repository) .git/config is specific to that single repository. Each level overlap the value of the previous level, so values in .git/config overlap those in /etc/gitconfig.
In Windows systems, Git looks for the .gitconfig file in the $home directory. This means one of the following directories: C:\Documents and Settings\USER for most users.
For detailed informations on how to setup your commit author’s data, read this article: How to configure Git username and email.
Commands to configure name and email on Git
Set your name and email to be added as author of Git commits.
For global configuration in the current system, for example using my data:
git config --global user.name "Ademir Mazer Junior"
git config --global user.email [email protected]
To understand how to configure your username and email by project or for the whole system, read this article: How to configure username and email by project with git.
Configure Git with Prompt Colorful:
git config --global color.ui true
Commands to list settings
To list all settings
git config --list
To list a specific configuration, for example the user.name:
git config user.name
Git Commands Help
To list commands available and open the help manual for each action, use the following commands:
git
Type only git lists all actions available with a summary explanation of your goal.In this way it is possible to have an overview of existing commands.
git help "action"
Opens the specified action manual page, for example: git help commit
Creating a local Git repository
To create a new repository:
git init
- Create a new folder (a new repository can be created in a folder with existing files)
- Access the new folder through the command line
- Enter the repository creation command
For example, in a Linux system:
mkdir novodiretorio
cd novodiretorio
git init
Check Git repository status
To check the repository status, that is, which Branch and which files are modified, use:
git status
Fetching a remote repository in Git
First, to fetch a repository means performing a clone of a remote repository, with the purpose of downloading and connecting your local GIT work directory with it.
The clone will be created from the directory where you are situated, so make sure the subdirectory will be where you want.
To create a copy of work in a local repository running the command:
git clone /path/to/repository
For example, when using a Github remote server, your command may be
git clone https://github.com/uepg/laravel-sybase.git
This way the above command will create the laravel-sybase subdirectory from the point where you are in the file system.
Add and confirm (commit) changes
The core of the workflow of GIT versioning are the actions of: add files to be tracked, enter changes and consolidate these changes. In short, it is your basic workflow, ie what you do daily to ensure this control.
To add (propose) changes, that is, add them to the index , this is the first step in the basic workflow of GIT, use the git add action, for example:
git add <arquivo>
git add *
Using the joker all ( * ) you add all changes and new files. But you can, select the file set indicating them individually or together.
To really confirm these changes, that is, consolidate in the local repository, use the commit action. As a good practice, always with comments, for example:
git commit -m “Semantic comments”
As a result the file is “sent” to the head, in the local repository, however, not yet to the remote repository.
In short: When creating or changing files, git add, then consolidates with git commit.
Ignoring files
First it is necessary to understand that tracking binary files such as executables, or directories and IDE configuration files, for example, are not good practices, as the repository will use a lot of space resource and increase the use of time to process its actions. Consequently degrading its performance becoming less efficient.
Thus informing GIT that certain files or directories should be ignored is a good practice for repository management.
To ignore files, create patterns within a .gitignore file in the root of the repository. For example:
# Compiled source #
*.com
*.class
*.dll
*.exe
*.o
*.so
.gitignore files can be used at the root of the project, or in subdirections if this facilitates your management.
In order to offer a set of common files to be ignored, Octocat’s Gist in Github, for example, has a series of .ignore files that can serve as an initial basis for your repository:
Attention: files that are already being traced are not affected by the .gitignore rules, so it is no use including a file in the rules after it is already being managed by GIT.
Submitting changes to the remote repository
Your changes are now in the head of your copy of local work, ie the remote repository does not contain these changes. To send them to your remote repository, for example, send the branch named main, run
git push origin main
Change main to any desired branch by sending your changes to it.
However, if you do not cloned, that is, you did not create the repository from an existing repository and want to connect your repository to a remote server, you must first add it with the command:
git remote add origin <servidor>
This way you are now able to send your changes to the selected remote server.
Repository log
To consult the history (log) of changes, commits, tags created, that is, if you want to check the change log (tag, branch), just use the command:
git log
This command will list the activity in chronological order from the latest to older. The listing is presented by enabling your navigation, for example, using up and down arrows. To get out of this navigation use the q key.
Update and merge changes
To update your local repository, that is, “pull” the newer changes of version, probably from your teammates, the remote repository, run the following command in your workbook. This command will perform two actions: obtain remote changes and make merge (mix) with local changes.
git pull
To make merge from another branch in your active branch , for example, if you are in the branch named feature200 and wants to incorporate the changes already accepted in a branch named dev:
git merge <branch>
# Following the example described above:
git merge dev
Conflict
When a merge results in conflicts, that is, portions of the same code have changed by different users, or in different branches; you are responsible for making the merge of these conflicts manually by editing the files displayed by GIT.
After making conflict adjustment changes, it is necessary to mark them as merged with the command git add <file> before making the changes.
Ramifications (branchs)
First, read this post to better understand what are Branches?
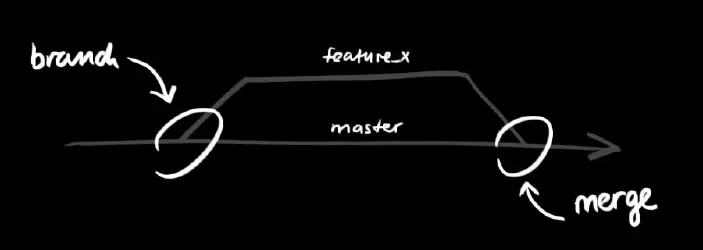
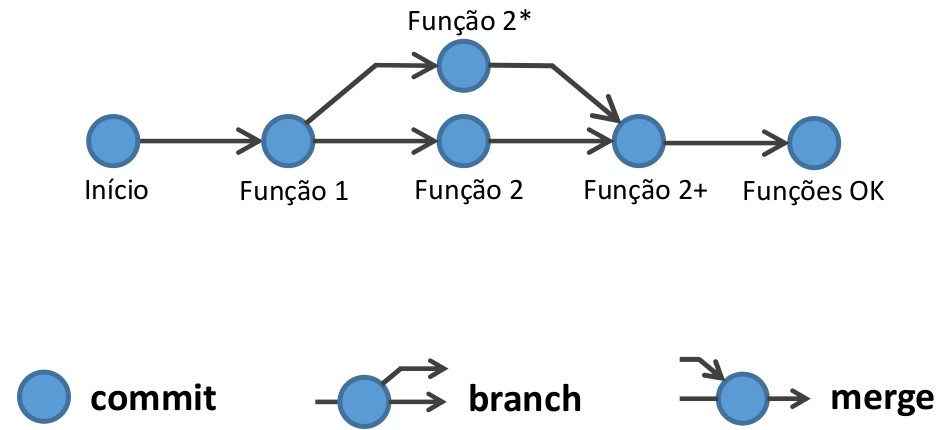
Branchs are used to develop isolated features of each other. The branch main is the “standard” branch when you create a repository. Overall, a good practice is to use other branches to develop and merge them with branch main after the changes. As for example demonstrated in the following image:
The most common visual “map” to represent the branches of a repository follow the following example:
Creating branches and navigating among them
Firstly, it is important to know that the creation of a new branch is performed as a copy of the “moment” when you are in your repository work directory.
There is more than one Git command to create white:
git branch <new-branch-name>git checkout -b <new-branch-name>
I frequently exchange branches with the command: git checkout, using the -b option to create a new branch, because if you use git branch it will also need to perform a git checkout to change the work directory for the new newly created one.
For example, if I want to create a branch called functionality_x , from the point I am, I use the command:
git checkout -b functionality_x
As a result, the branch functionality_x is created and GIT changes the work directory for it. Thus, when changing files and performing the commit, the changes will be consoities in this branch.
Read this article tag difference and branch in git
If you need to change to another branch, that is, navigate or change your work directory on another branch, use checkout without -b, for example, to return to branch main
git checkout main
If you need to delete, ie remove a branch from the local work directory, use the -d action from branch option. For example to exclude the branch functionality_x
git branch -d functionality_x
Stay tuned for the central repository update if you need to make a branch available to other team members, it will not be available unless you send it to the remote:
git push origin <branch-name>
Final considerations
As seen in this article, Git is an effective and efficient versioning system for configuration management in your software project.This was an introduction that demonstrated an overview of daily and more common use of both functions.
Be sure to perform the initial guided practice, which is available at the end of the following file slides.Also watch the video lesson where I explain in more detail the items and concepts described in this article.
Continue learning about GIT and software versioning in the next articles in this section.

Comments