Conky is a very light system monitor to be used on desktops with the X server in Linux systems such as Ubuntu, Debian, Mint, Redhat, Mandriva, etc.
If you, like me, like to have some information about operating system, quickly available on the screen, meet Conky, which I consider the best desktop monitor on Linux.
Before I found Conky I always looked for the famous gadgets and widgets, and I came across the project Screenlets, commonly used by Gnome users. However, after using it for a few weeks, I was not satisfied with the possible settings offered and the use of CPU resources and memory.
Searching I found the Conky project, which answered very well to what I needed to monitor my Linux Ubuntu system, and then my actual OS the Linux Mint.
In this article I present an overview of it from the settings I use on my computer.
What is Conky for Linux
Conky is a very light system monitor to be used on desktops with the X server in Linux systems such as Ubuntu, Debian, Mint, Redhat, Mandriva, etc.
It is distributed under GPL license and can run in Linux and BSD.Version 1.12.2 is the latest stable version available at the time this article was written.
The address of the project repository is https://github.com/brndnmtthws/conky.
Features
It has over 300 objects available and ready for use, including support for:
- Show information as text or using simple progress bars and graphic widgets with different colors and sources
- A large amount of SO Linux status information (UNAME, UPTIME, CPU use, memory use, disk use, “top” process status, network monitoring, among others)
- INTERNAL SUPPORT FOR IMAP AND POP3
- Internal support for various music players (MPD, XMMS2, BMPX, Audacious)
- Can be extended using internal moon support, or any of your scripts and programs
- Works in Linux, FreeBSD, OpenBSD, DragonflyBSD, NetBSD, Solaris, Haiku and MacOS!
- Docker image available for AMD64, ARMV7 and AARCH64 (also known as ARMV8)
- Support to macros writen in Lua
and much more ….
How to install Conky on Linux
As it is a very popular application in Linux distributions, it is easy to install using official repositories:
Install Conky on Arch Linux
pacman -S conky
# query aur database
yay -Ss conky
Install Conky on Linux Fedora
sudo dnf install conky
Install Conky on FreeBSD
# Conky is in ports in `sysutils/conky`.
$ cd /usr/ports/sysutils/conky
$ make install clean
# Alternatively, install the binary package.
$ pkg install conky
Install Conky on Gentoo Linux
$ emerge conky
Install Conky on Linux Debian / Ubuntu / Mint
$ sudo apt-get install conky-all
Install Conky on NixOS
$ nix-env -i conky
Compiling the source code of Conky
Conky uses cmake instead of autotools, which means you will no longer need autoconf and automake, but you will need cmake.
You will need the following development packages if you keep the default Cmake configuration: apt-get install cmake libimlib2-dev libncurses5-dev libx11-dev libxdamage-dev libxft-dev libxinerama-dev libxml2-dev libxext-dev libcurl4-openssl-dev liblua5.3-dev.
Note that your cmake version should support C++ 17, which means it should be > = 3.8. Also note that the libcurl4-*-dev specific package will be necessary to depend on which type of LIBCURL you have installed (OpenSSL is the default).
For macOs, you can get the necessary libraries using this commands.
Conky compilation should be done with these commands:
$ mkdir build
$ cd build
$ cmake ..
# This will launch a IU based on curses, where you can configure
# everything, when ready, you can build as usual:
$ make  # This will compile Conky in the subdirectory `src`
$ make install
Instead of running ccmake .. you can also run the cmake .. which will only assume the default values for everything.
Conky BUILD_FLAGS
$ cmake -L | grep "^BUILD" | sed -e "s/:BOOL//" | column -t -s "="
BUILD_APCUPSD         ON
BUILD_ARGB            ON
BUILD_AUDACIOUS       OFF
BUILD_BMPX            OFF
BUILD_BUILTIN_CONFIG  ON
BUILD_CMUS            ON
BUILD_CURL            OFF
BUILD_EVE             ON
BUILD_HDDTEMP         ON
BUILD_HTTP            OFF
BUILD_I18N            ON
BUILD_IBM             ON
BUILD_ICAL            OFF
BUILD_ICONV           OFF
BUILD_IMLIB2          ON
BUILD_IOSTATS         ON
BUILD_IPV6            ON
BUILD_IRC             OFF
BUILD_JOURNAL         OFF
BUILD_LUA_CAIRO       OFF
BUILD_LUA_IMLIB2      OFF
BUILD_LUA_RSVG        OFF
BUILD_MATH            ON
BUILD_MOC             ON
BUILD_MPD             ON
BUILD_MYSQL           OFF
BUILD_NCURSES         ON
BUILD_NVIDIA          OFF
BUILD_OLD_CONFIG      ON
BUILD_PORT_MONITORS   ON
BUILD_PULSEAUDIO      OFF
BUILD_RSS             OFF
BUILD_WEATHER_METAR   ON
BUILD_WLAN            OFF
BUILD_X11             ON
BUILD_XDAMAGE         ON
BUILD_XDBE            ON
BUILD_XFT             ON
BUILD_XINERAMA        ON
BUILD_XMMS2           OFF
BUILD_XSHAPE          ON
Some variables will require the build flags to be enabled. You can download source code and compile with skilled flags.You can ask the maintainer to enable them for future versions of Conky.
Starting Conky with the session
To start Conky at the beginning of the user session, at Linnux Ubuntu or Mint, visit the menu: System -> Preferences -> Session Applications.
In the window that opens you will see the list of apps that are loaded at the beginning of the session, to add it click Add and fill the fields.
By default the application begins with its name only:
$ conky
However, in the following example, the pause option with value 30 can be passed to wait 30 seconds to conky be executed
$ conky --pause=30
This option is used for the start of the Conky app to occur with a delay of x seconds, in this case 30.
This is interesting because if the application starts directly in session loading, its window is not shown nor its process is created in daemon.
In my case the time of 30 sec is sufficient for all necessary processes to run up before Conky and it starts as expected, if your computer needs more time or does not need so much, just adjujst this the value.
How to configure Conky manually
To change the appearance of Conky on your desktop, you can edit the system configuration file on folder:
/etc/conky/conky.conf
A safer approach is to create an user specific configuration file for conky in the user directory:
~/.conkyrc
You can use /etc/conky/conky.conf file as a model for your specific user configuration by copying it’s content.
cp /etc/conky/conky.conf ~/.conkyrc
From this file you can manually adjust with your settings
Conky themes
In order not to configure everything on your own, you can use or start from an existing theme. Conky themes help you fully customize the appearance of Conky software.
There are many Conky themes available for free on the internet. And finding out which theme will be best in your desktop is a slightly time -long initial task. So I present a list of the top 5 Conky themes for your Linux desktop that you can install now to make your Conky more attractive and exclusive.
Conky Orange

Conky Orange is a variant of one of Conky’s most popular themed series. There are different other variants of this theme of the same author, such as Conky Red, Conky Gray, etc. The elements of this theme are modern and elegant.
It shows different system parameters in the viewer similar to a round clock dial.
Clock, calendar, CPU status, memory use, network activity, etc., can be shown with this theme.
Its base color is gray, although it uses an orange tone to highlight the main points.Users can customize the views of the viewer by editing the Moon and Conky scripts.
Conky Chronograph Station
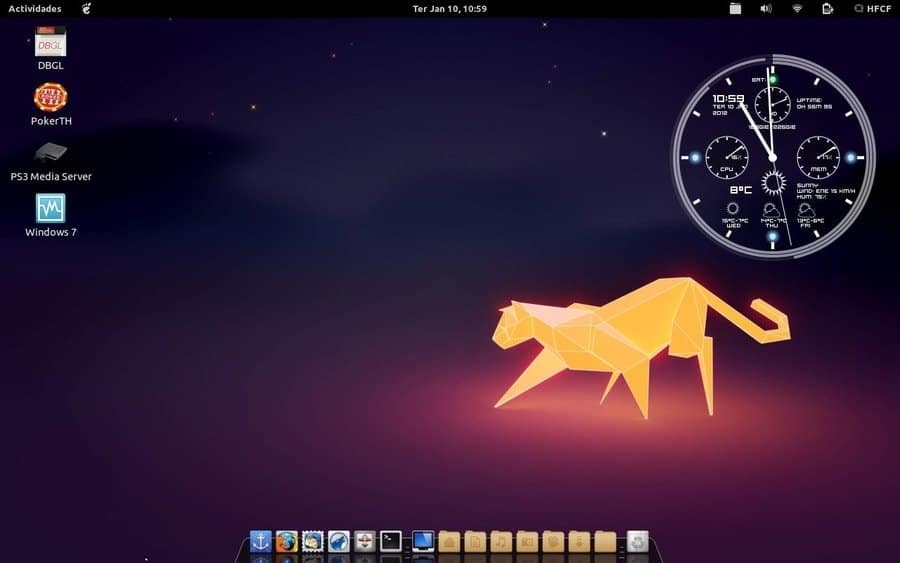
As the name suggests, it follows a chronograph style design language to display different system status parameters.
Conky Chronograph Station’s beautiful viewer looks like a modern Swiss chronograph clock. It shows the time, date, CPU activity, memory use, temperature and other aspects of the system within the clock dial.
Each parameter has its dial meter. It can even show AccuWeather’s weather updates with beautiful graphic elements.Transparent objects with a white tone are beautiful in any work environment.
Conky Colors
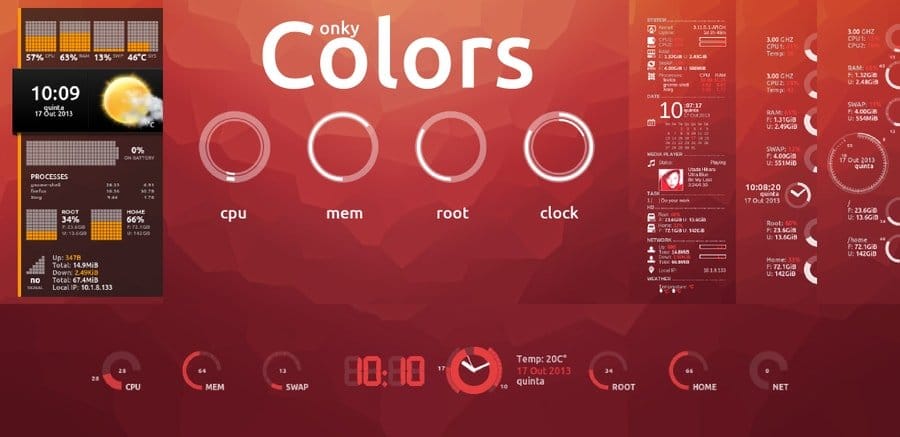
Conky Colors is a beautiful Conky theme with a modern user interface. You can configure different colored tones to match your wallpaper. The standard white theme has a very elegant look.
The main feature of this theme is the use of different contextual icons. The updated icon set will be shown with parameters such as music, IP location, calendar, etc.
It has clock meters to show processor status, memory use, disk use and different status information.
This Conky Script supports many European languages, including German, Polish, Russian, Spanish and Ukrainian. So anyone without knowing English can modify the script and customize it accordingly.
Future Blue Conky

This is a very old theme for Conky. It was last updated in 2010.
But this Conky looks so cool and functional that I couldn’t help but include it on the list. This theme has a futuristic aspect painted about it.
By installing it on your desktop, you will feel about working on Alien technology, just as you see in some Hollywood science fiction films.
The visual elements have a refreshing tone of ice blue. The source face is stylized so that it can easily mix with the overall design.
This Conky also supports Exaile media breeder to display music information. The developers planned to bring another support to media breeders, but the project was discontinued.
However, this theme is so complete and stable that you don’t have to worry about the developer’s support.
AutomatiK
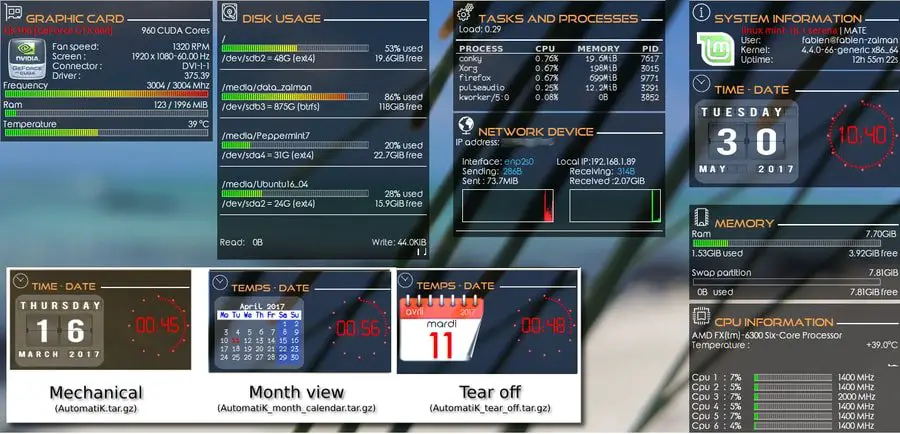
Automatic is a Conky theme that you don’t have to configure by opening the Conky script file. This theme automatically checks the hardware components of your computer and configures Conky accordingly.
Everything happens Automatics, and this is its main feature. It supports different languages, including Japanese, French, Italian, German, Portuguese, etc., and translates Conky components into your language when you need them.
This conky can sweep your Linux distro, CPU speed, nuclei number, GPU type, mounted drives and various other things.
If you click by pressing the Alt key, you can easily move the work area widgets.
It provides support for AMD and Nvidia GPU and has different beautiful visual components to choose from.
Google Integrated System Conky
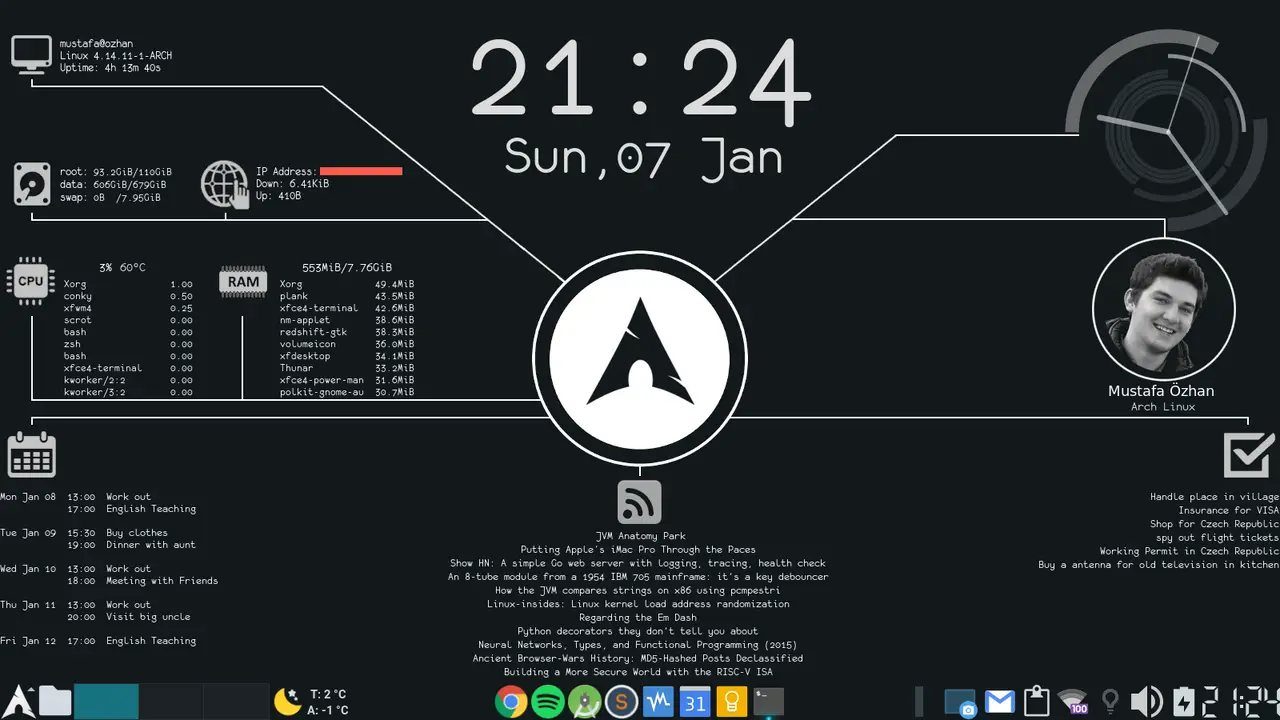
This theme has a long list of features. The graphic elements and the general interface of the user are very bold and beautiful.
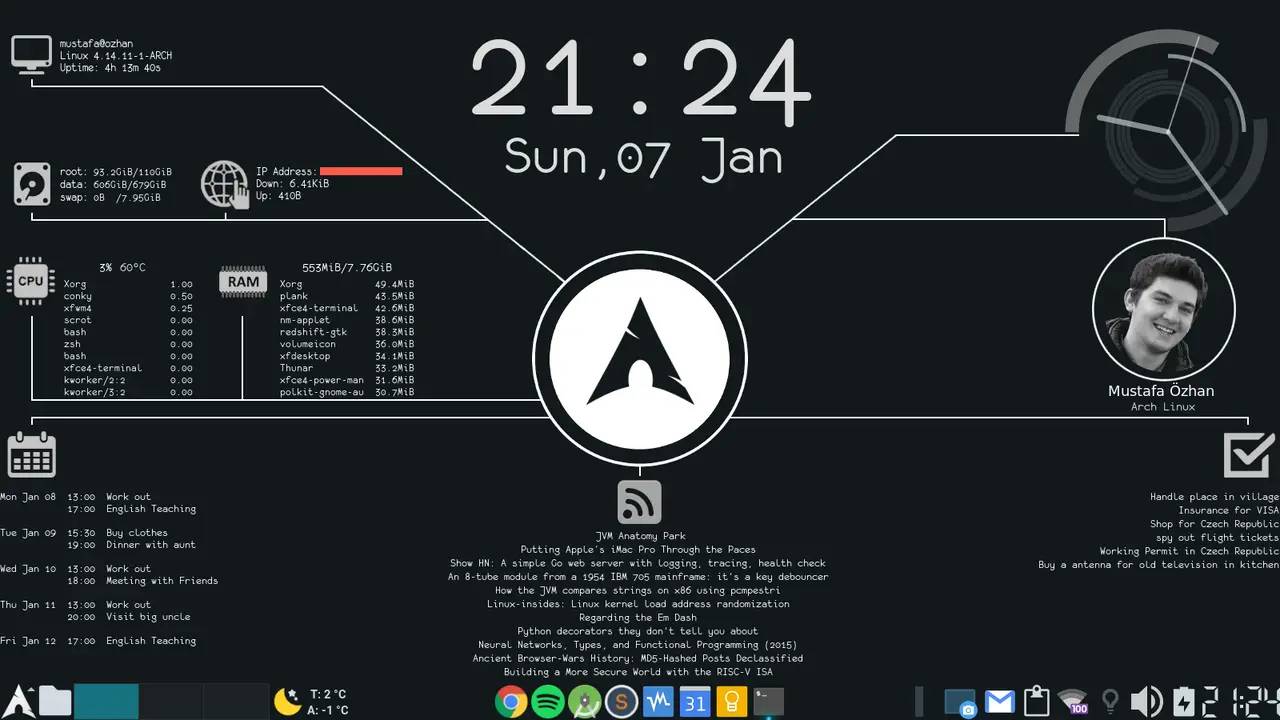
The main aspect of this theme is the integration of some Google services. It can show the next events on your Google Agenda.You can also manage your task list created with another popular application, Google Keep, directly on your desktop.
Integration with RSS Feed is a bonus resource, but is useful. The general configuration is organized so that you can easily take a look at your next agenda right after connecting to the Linux desktop.
System status such as time, date, CPU load, memory use, etc. are also available.


Comments